Introduction
I recently got a pair of Tozo T6 earbuds. They’re great and I love them but they play a sound whenever you pair, unpair, or connect them, and it’s way too loud for my preference.1 I also wasn’t able to fix it by e.g. setting the equalizer to subtract a few decibels across the board. I asked them via email about this and they responded promptly and said that there was nothing they could do, which is understandable - it’s probably not a common request. But it was too loud for me to continue using them, so I decided to try to solve the problem myself.
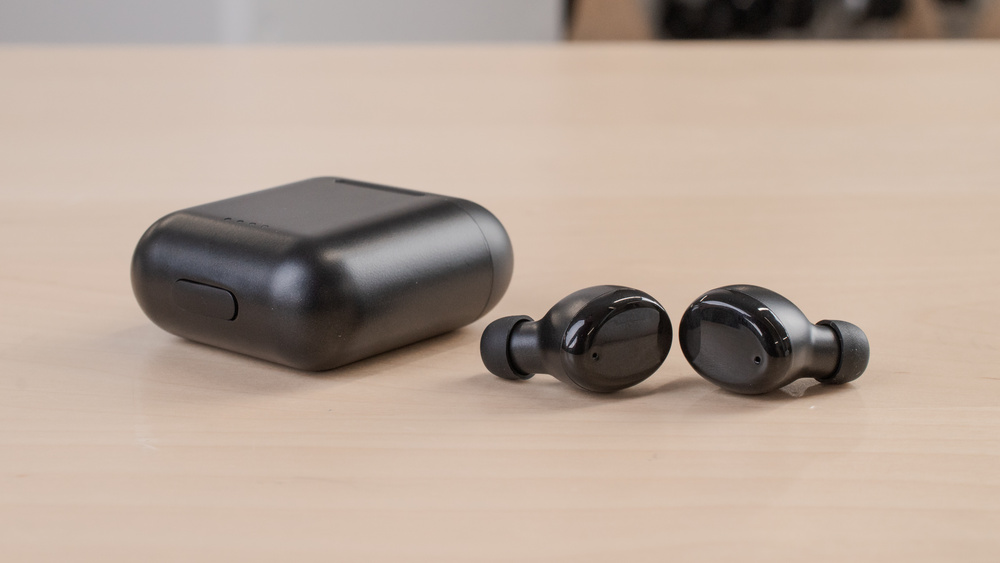
Tozo T6 earbuds. They’re great. I only have one complaint…
To solve the problem, I need to modify the firmware that runs on the device. My initial expectation of how this would work was:
- I would get a binary file from somewhere for my device. People often share firmware files online, maybe I could find a copy using a search engine.
- The firmware file would be in some easily-understood binary structure like ELF.
- The audio files would be contained in the binary somewhere, maybe as an ELF symbol (going from the last point). Knowing how the image format worked would let me modify the data within it while making sure that I didn’t accidentally give it a corrupt image and possibly brick my device.
- The audio files would be in a format that would be easy to transform, maybe PCM since it’s running on an embedded device with perhaps limited computational power to decode audio (of course, it’s also a headset, so probably it can decode compressed audio just fine).
- Once I can modify data within the firmware image (either unpack/repack it or modify data in-situ by knowing its offset and length within the image), do so to make the audio quieter (e.g. if it’s PCM then maybe halve each sample, etc).
- Finally, I would flash my modified firmware to the device with some kind of tool made for my model of equipment or its underlying chipset, etc.
Some of these assumptions ended up being completely false and unwarranted (I have no idea why I hoped that the audio would be uncompressed on a low-power device like this, for example), but this was my thinking starting out. It also doesn’t include any reverse engineering, which ended up taking up most of the time that wasn’t spent on setting up infrastructure (such as an intercepting proxy), but this was mostly just going down rabbitholes. In the end, I actually didn’t need to reverse engineer much at all. So this post is less about reverse engineering and more about the general process of solving my particular problem.
First steps: initial research
The first step is to collect information about what exactly the device is. There seem to be several different entities involved in the production of cheap electronics:
- The vendor, who actually brands and sells the device - Tozo, in this case.
- The chipset, a specific piece of hardware the device is mostly designed around, which runs the firmware code and might have special features for the application at hand.
- The ISA - the chipset will run code of a particular instruction set, with a “core” derived from some other base tech like ARM, MIPS, etc (or perhaps they rolled their own).
- Additional features - the chipset might integrate technology from other people onto their chip, such as additional coprocessors, chips to interface with different kinds of hardware, etc.
The chipset for my device ended up being an Airoha AB1562, which apparently is based on an Tensilica Xtensa ISA and includes a “Cadence HiFi DSP coprocessor”. I wasn’t able to find this out searching for my device model however, so I ended up just looking through the disassembly for their Android app. There I found an SDK for a company called “Airoha”, with references to specific chip models and containing all of the primitives for talking to devices. I wasn’t able to find any other chipset SDK’s, so I assumed this was the chipset manufacturer.
I still had to find the specific model though. After a bit more searching, I found a Reddit community for discussing AirPods clones called /r/airreps, which gave me some good advice about how to proceed. They have also written an Android application called “AirReps156X”2 which also uses the Airoha SDK, and can provide diagnostic information about Airoha devices3. I was able to connect to this app with my device, so it’s definitely an Airoha chipset, and one of the diagnostic strings was “QW_1562U_SDK1.5.1”, which leads me to believe that my device chipset is in the Airoha AB1562 series:
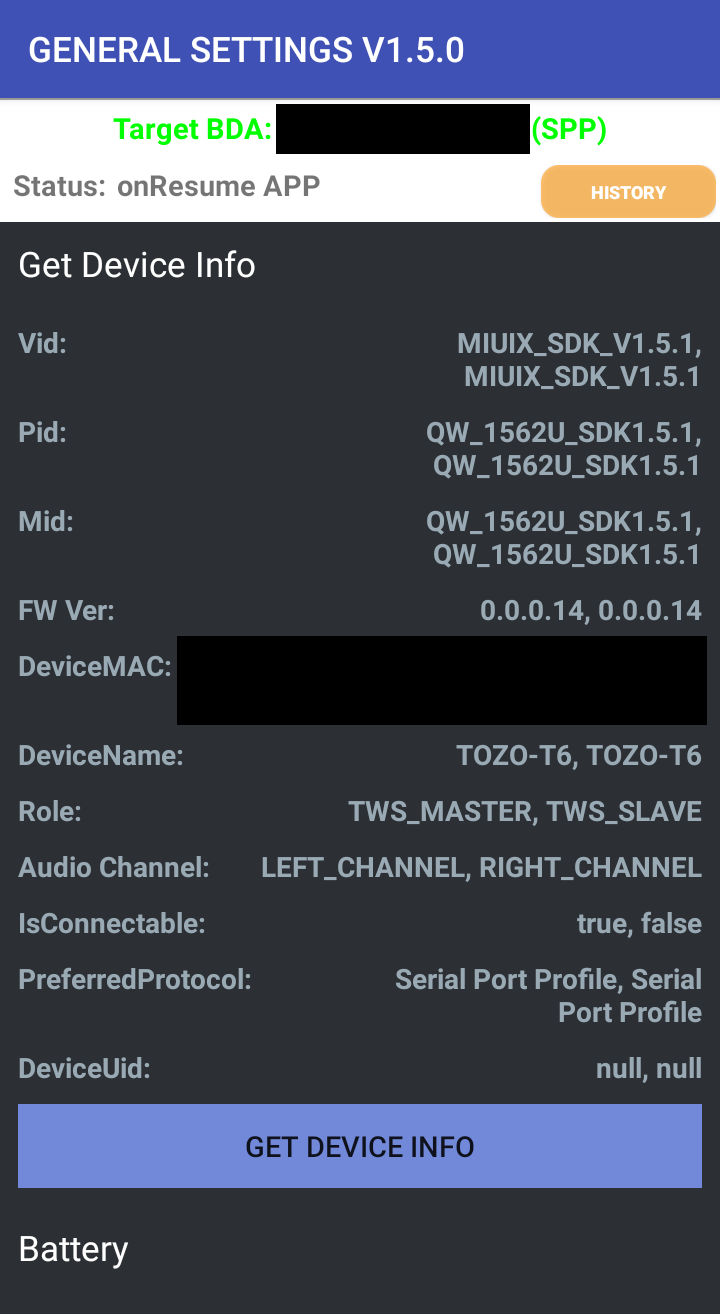
The “Airreps 156X” app display device information.
The application also lets you flash new firmware, which is a fairly critical item on the checklist. So now that we’ve gotten that prerequisite out of the way and identified the chipset all that’s left to do is to find the actual firmware and modify it.
Finding the actual binaries
The Tozo application is my first lead. When you connect your earbuds to the Tozo app, it displays the firmware version and whether or not it’s “current”. So it must talk to a server somewhere, which knows what the latest version of the firmware is:
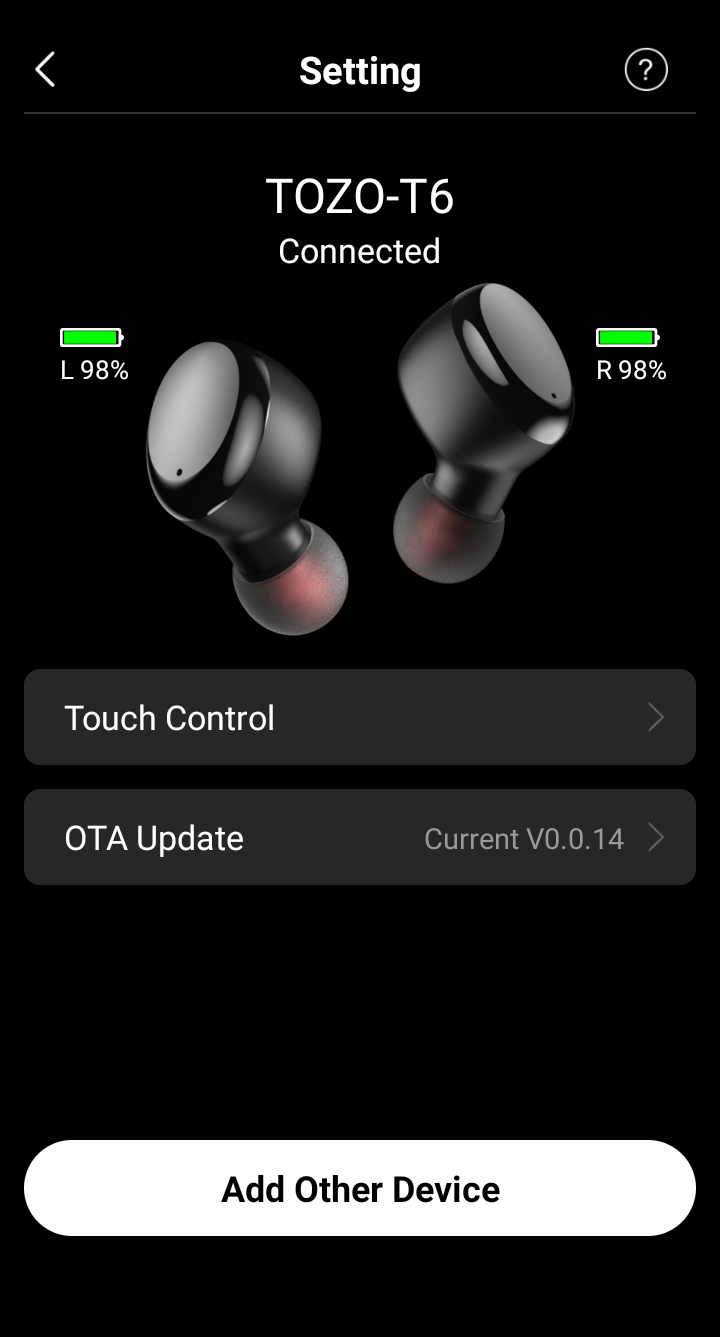
Tozo’s app displaying the current firmware version.
In theory, I could probably just read through the decompiled code in jadx or something until I find out what servers it’s talking to, how, and what it does when it checks for updates (such as, presumably, downloading the firmware files I’m looking for). But that’s a lot of work, so I have a better idea - when the app checks if the firmware is up to date, it might also make API requests that could shed some light on where to find the actual firmware files. It might even be able to be tricked into trying to update, which would also lead me to the right URLs. So some quick and dirty “dynamic analysis” via traffic interception is the logical next step.
Setting up an intercepting proxy
To this end I set up an intercepting proxy using my wireless NIC with hostapd and mitmproxy, and patched the Tozo app with apktool + uber apk signer so that it’ll let us strip the TLS and snoop on its raw network traffic.4
Patching the APK is pretty standard stuff - I just followed this gist. The idea is that Android applications have two CA stores, one that can be easily modified by the user, and one that can’t, and by default most Android apps only check TLS certificates against the latter. But, by patching the APK, we can tell it to use the former too, which is where we put our mitmproxy-provided TLS certificate that we’re going to use to snoop on all of the network traffic used by our app. Then we have to sign it so Android will deal with it.
The intercepting proxy setup was pretty straightforward - just set up the AP, set up some iptables rules to direct traffic to mitmproxy’s listening port, and do the typical NAT song and dance:
|
|
The script I used to start and stop the TLS-stripping wireless AP. I know make isn’t really the right tool for this, but it’s a force of habit at this point.
Snooping on the application’s network traffic
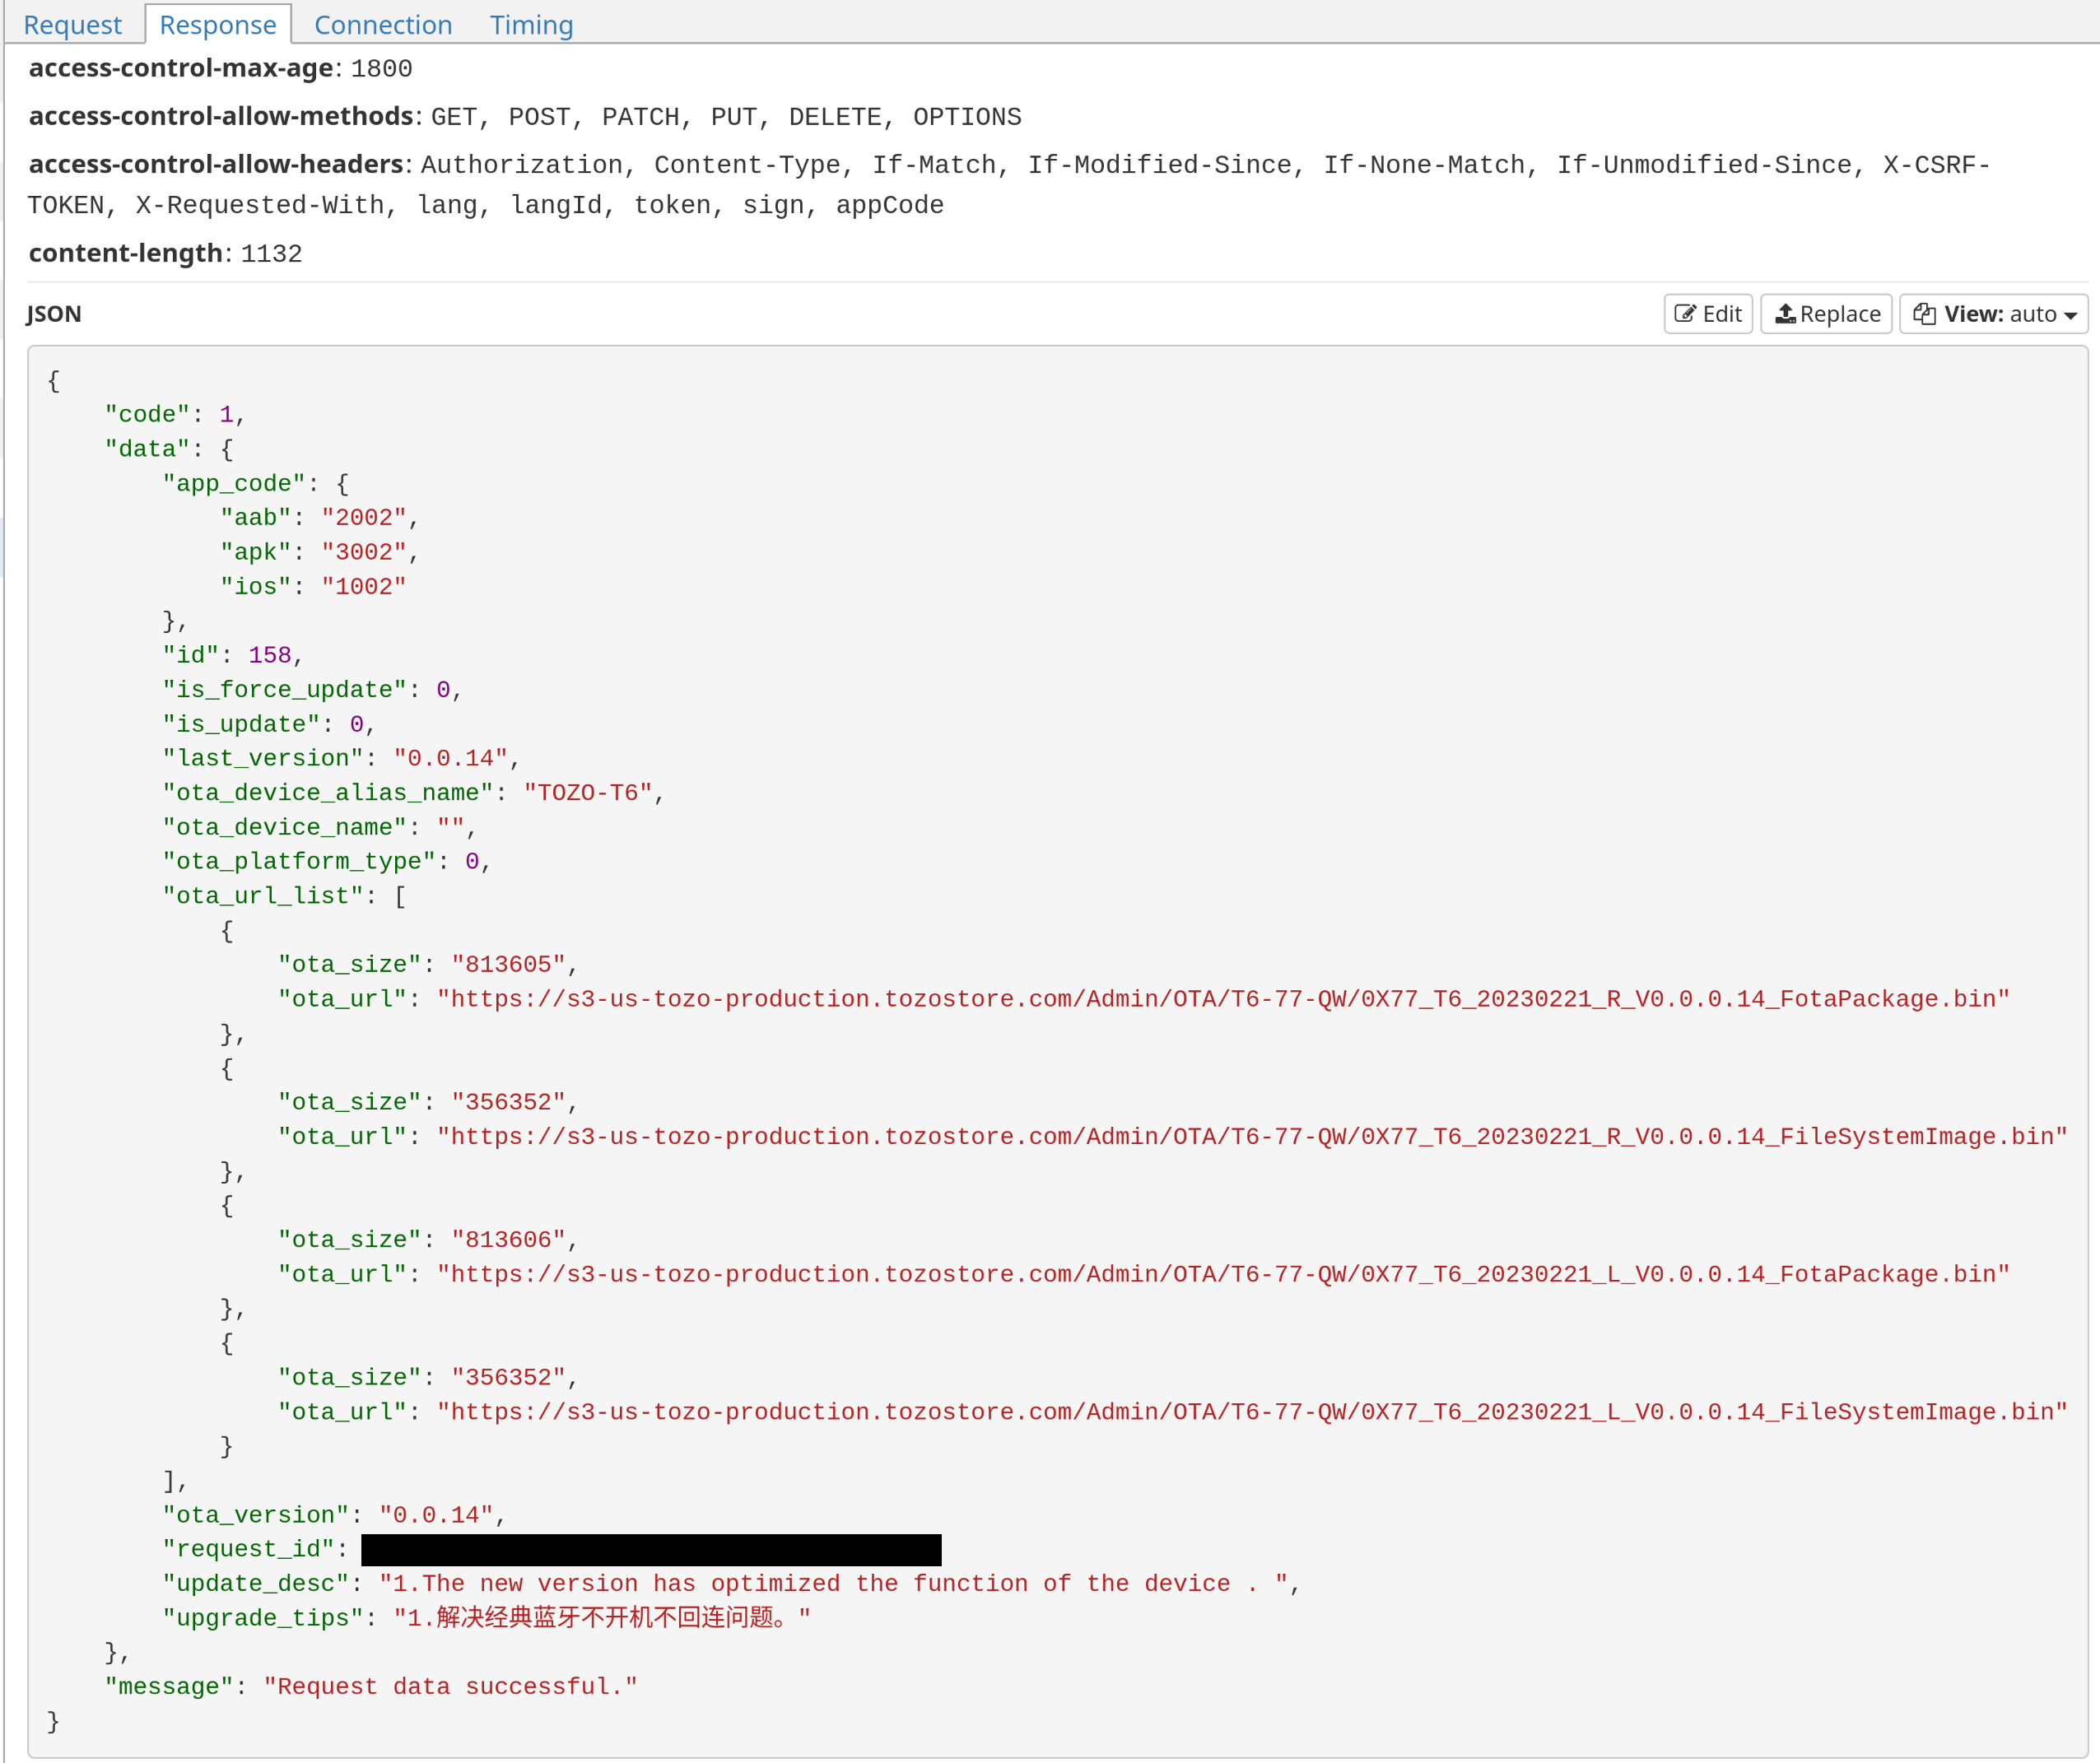
Once it was all working, I saw that when I connected the device to the app and the “current” string popped up next to the firmware version, it made a request to an endpoint /api/v1/getOtaVersionV3. And, lo and behold, the response contains links to all of the firmware bins we’re looking for! How nice. No trickery needed.
getOtaVersionV3 Request in Wireshark getOtaVersionV3 Response in mitmproxy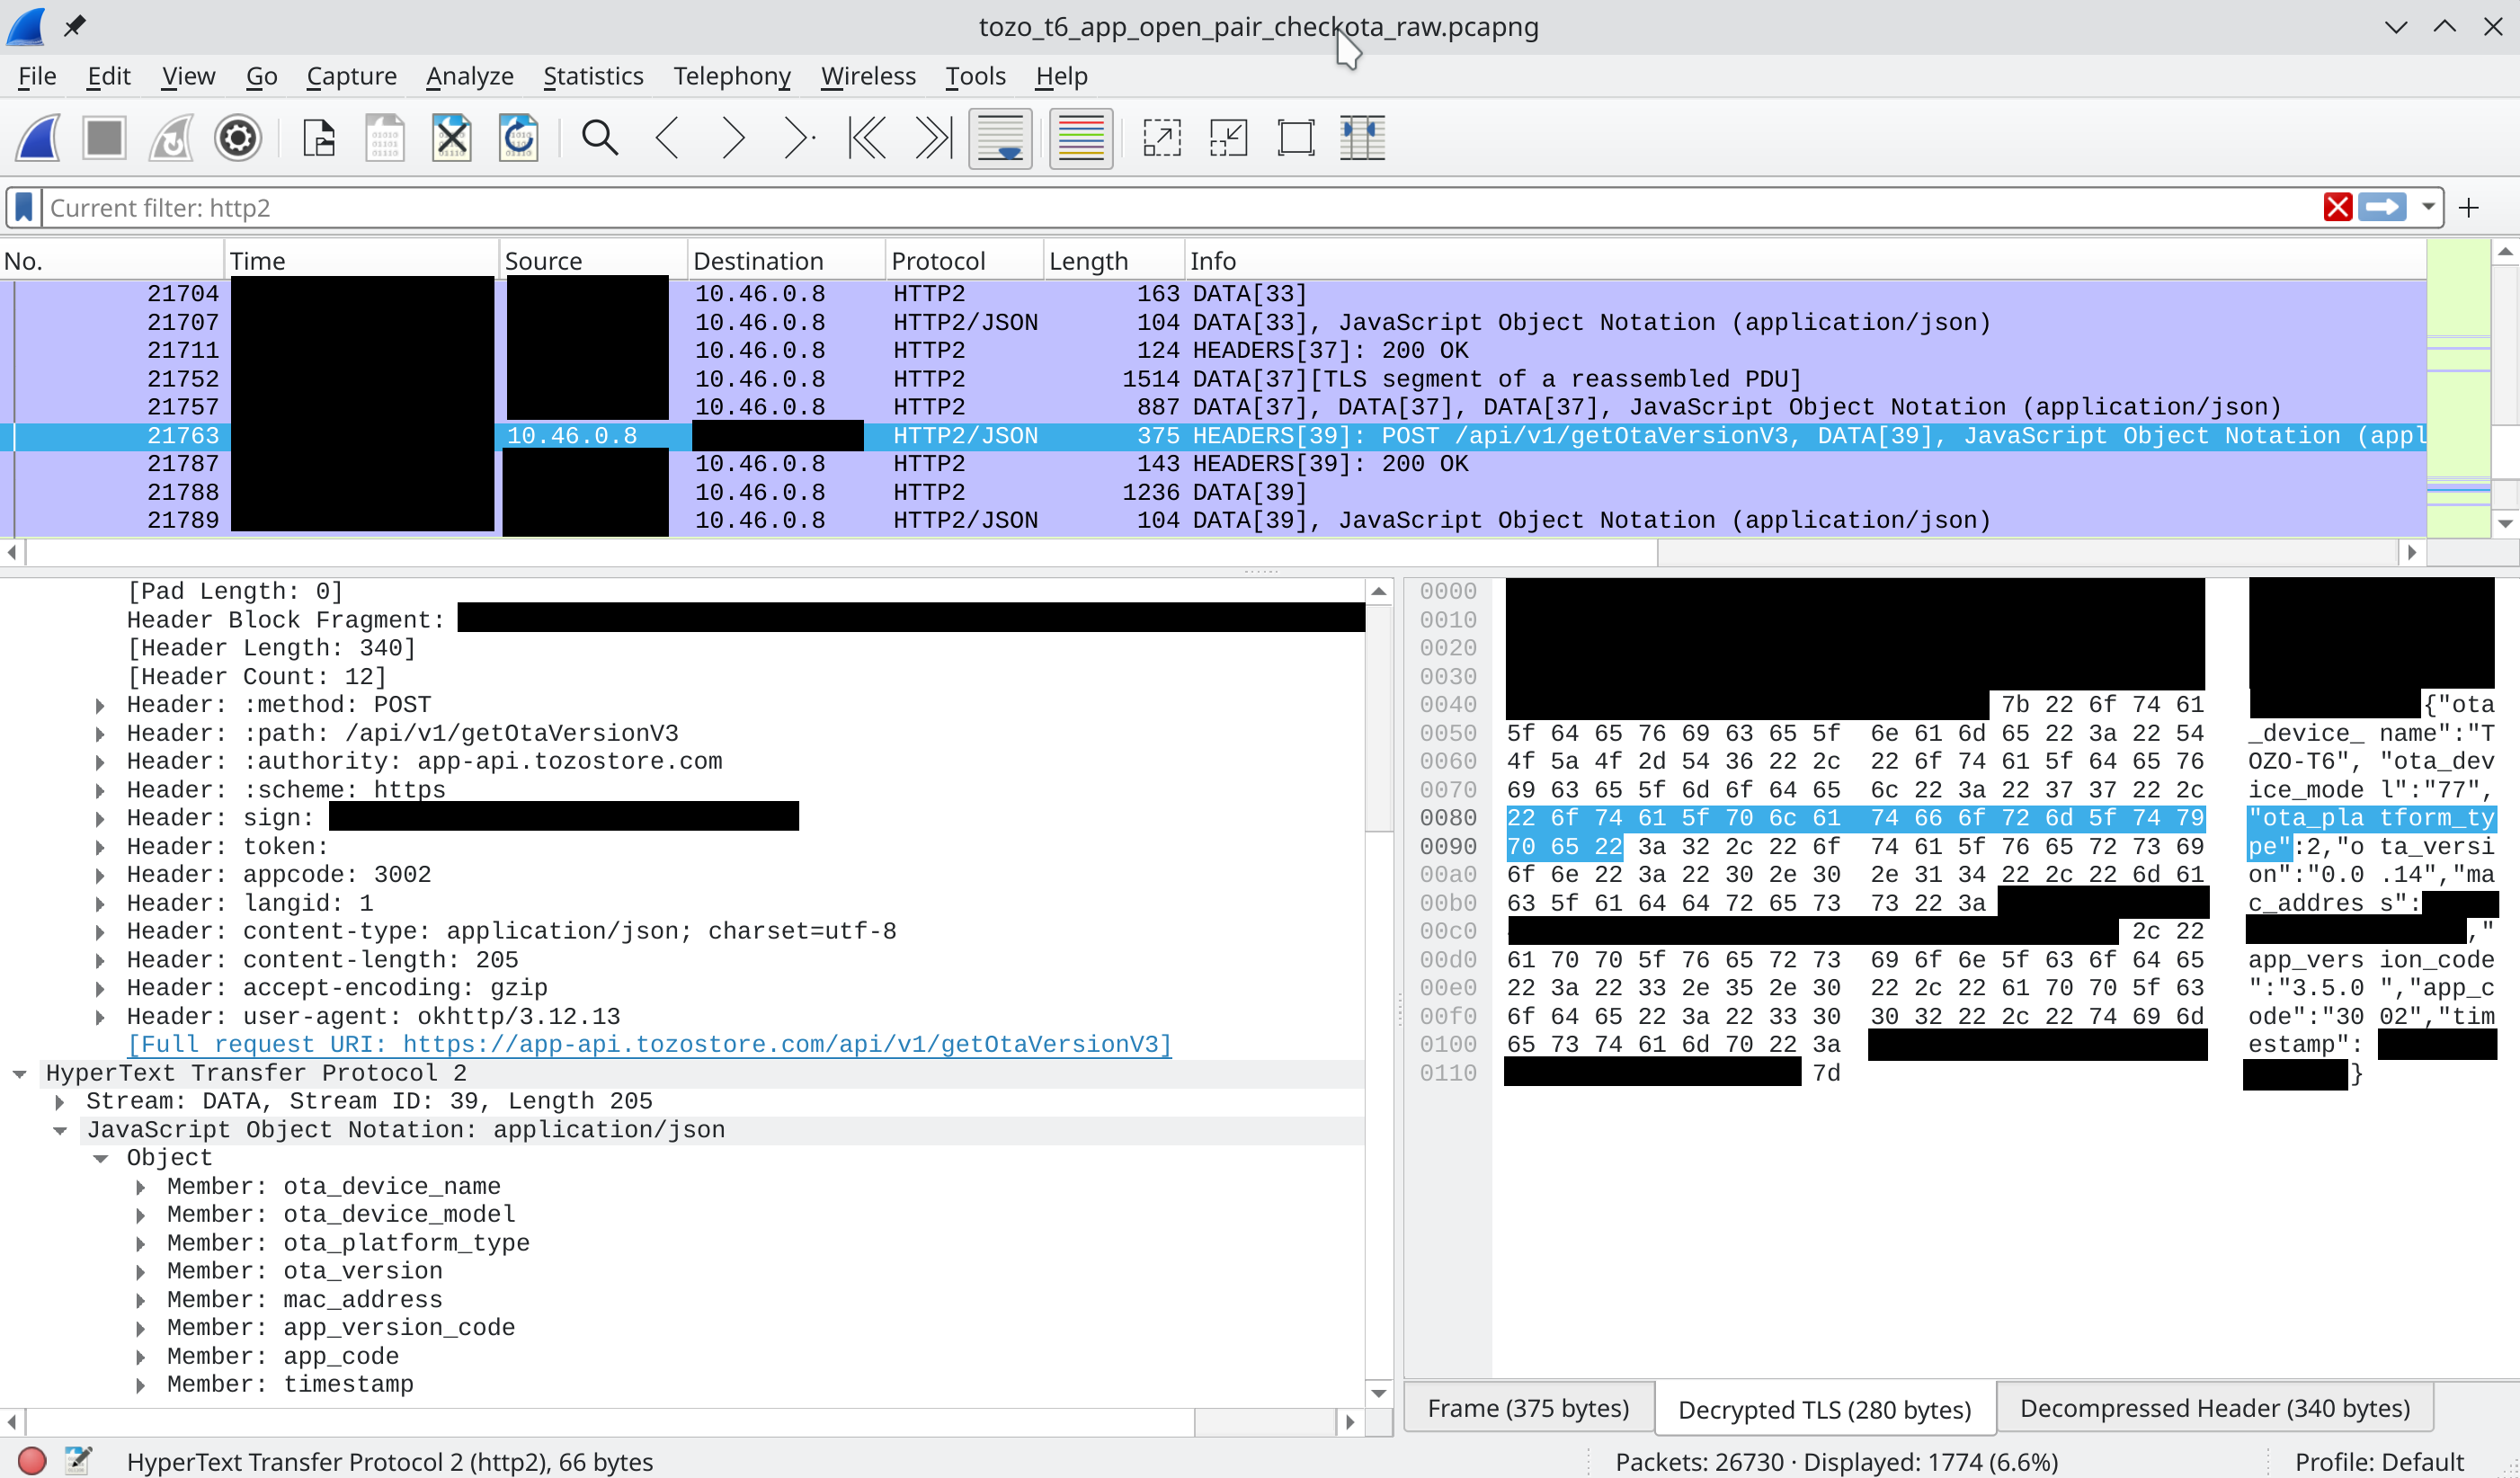
Analyzing the firmware
There are four files, two per earbud, each having a “FotaPackage” and a “FileSystemImage”. The two filesystem images are identical, so we wind up with three distinct files - two fotapackages for L and R earbuds, and the filesystem image.
The first thing anybody does when they get a weird file is, they run the Linux command “file” on it, to see if it has a magic number that indicates its file format:

Unhelpful.
…and, if that doesn’t help, they might run strings or hexdump over it, to see if there’s any interesting human-readable ASCII strings in it:
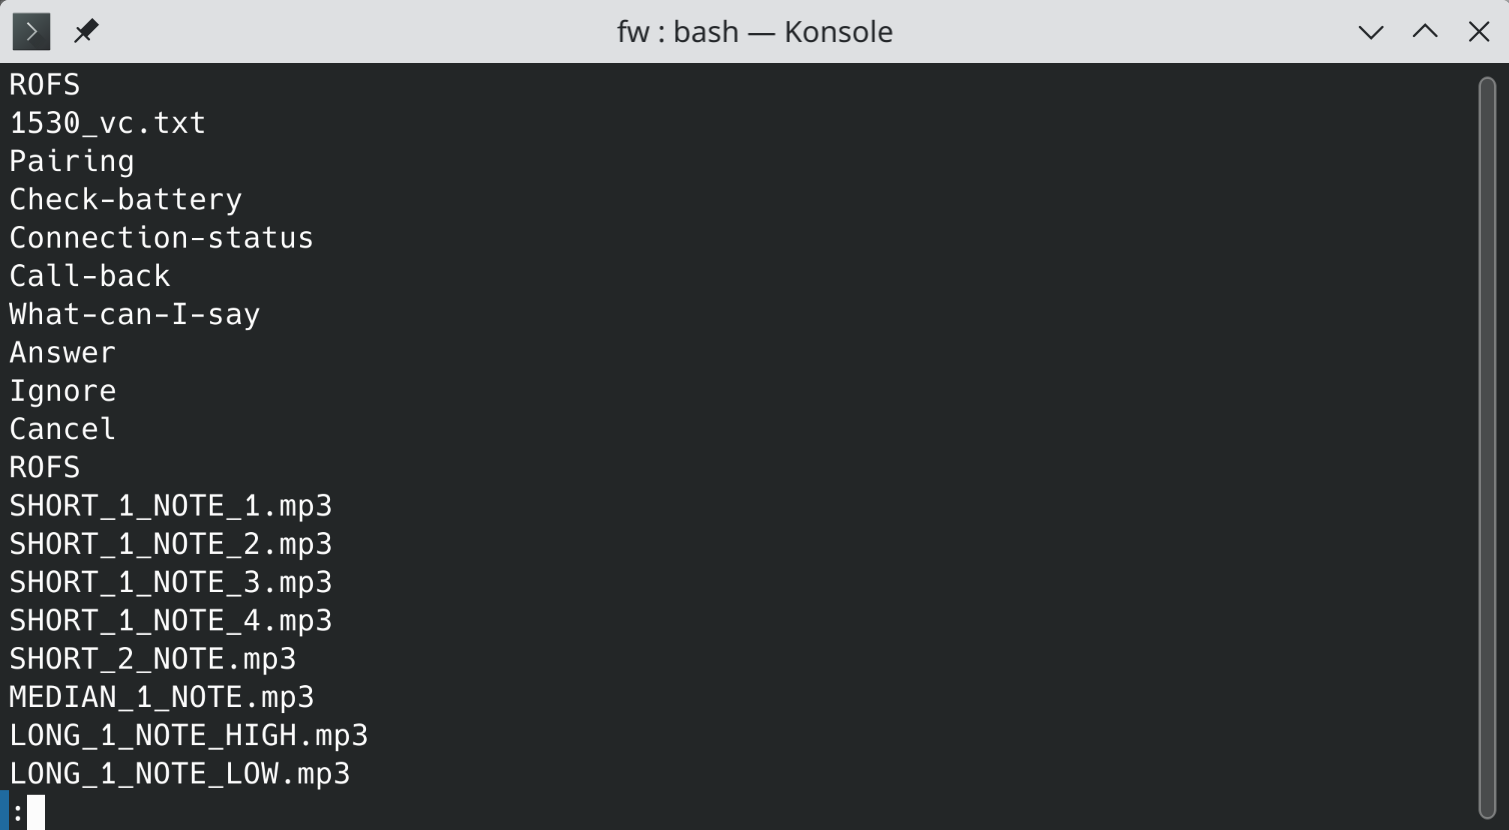
From the filesystem image - some filenames, at least.
and then binwalk to see if there’s any files embedded in it:
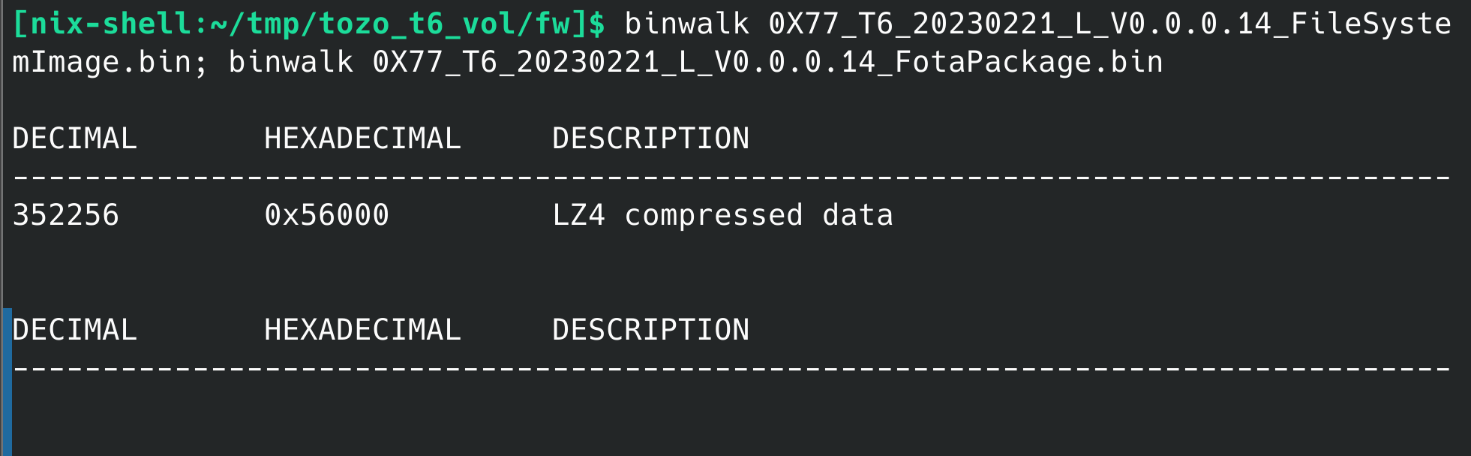
The LZ4 region contains the NVROM, which isn’t useful to us - it doesn’t contain any audio files.
Unfortunately, binwalk didn’t find anything, even the mp3 files whose filenames are referenced directly in the image. They are indeed in there, it’s just that the mp3 file format is just not very easy to carve out of arbitrary binary data because it doesn’t have any kind of magic number (it can start with either 0xFFFF or 0xFFFE, neither of which are particularly distinctive, and there’s no footer). So even though you can tell they’re in there, it’s not immediately obvious how to unambiguously calculate the offset and length for each mp3 file. So, I decided the best way to figure this out would be to decipher the filesystem image format, which probably has information that tells you where each file begins and ends.
Entropy analysis
The next step for this is entropy analysis. This basically tells you what parts of a file are constant (0x00 or 0xFF are popular bytes for this), which parts resemble random noise, which parts are valid ASCII text, and the offsets at which one of those things changes into another. It’s useful because it sometimes lets you visualize the structure of something without actually knowing anything about it.
The filesystem image looked promising (generated with http://binvis.io/):

It does some grouping of the data into blocks to make the structure more visible, so it’s not row-by-row like you might expect.
Unfortunately, the FotaPackage files however were obviously encrypted or compressed somehow:
It’s not looking good. Oof.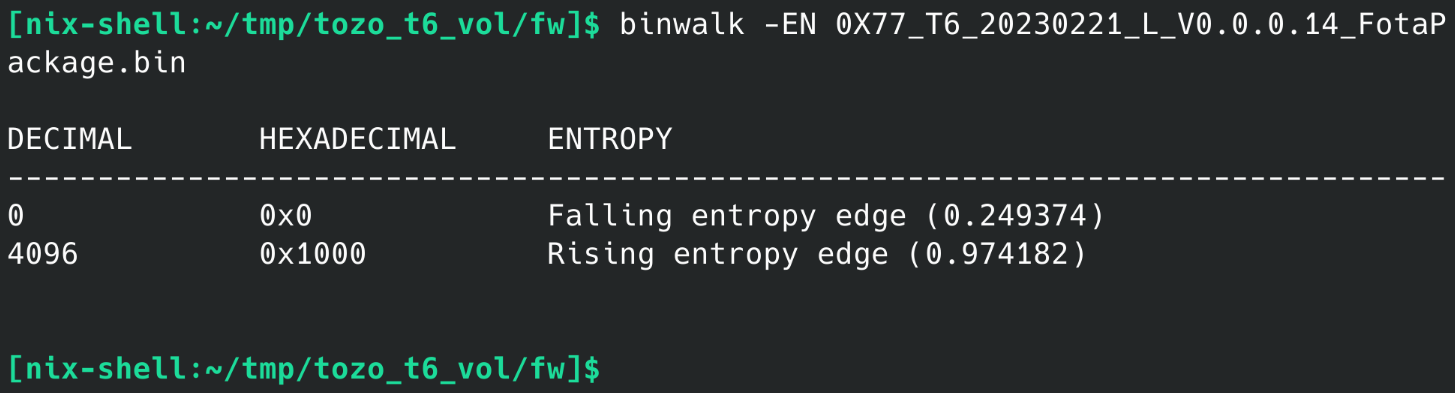

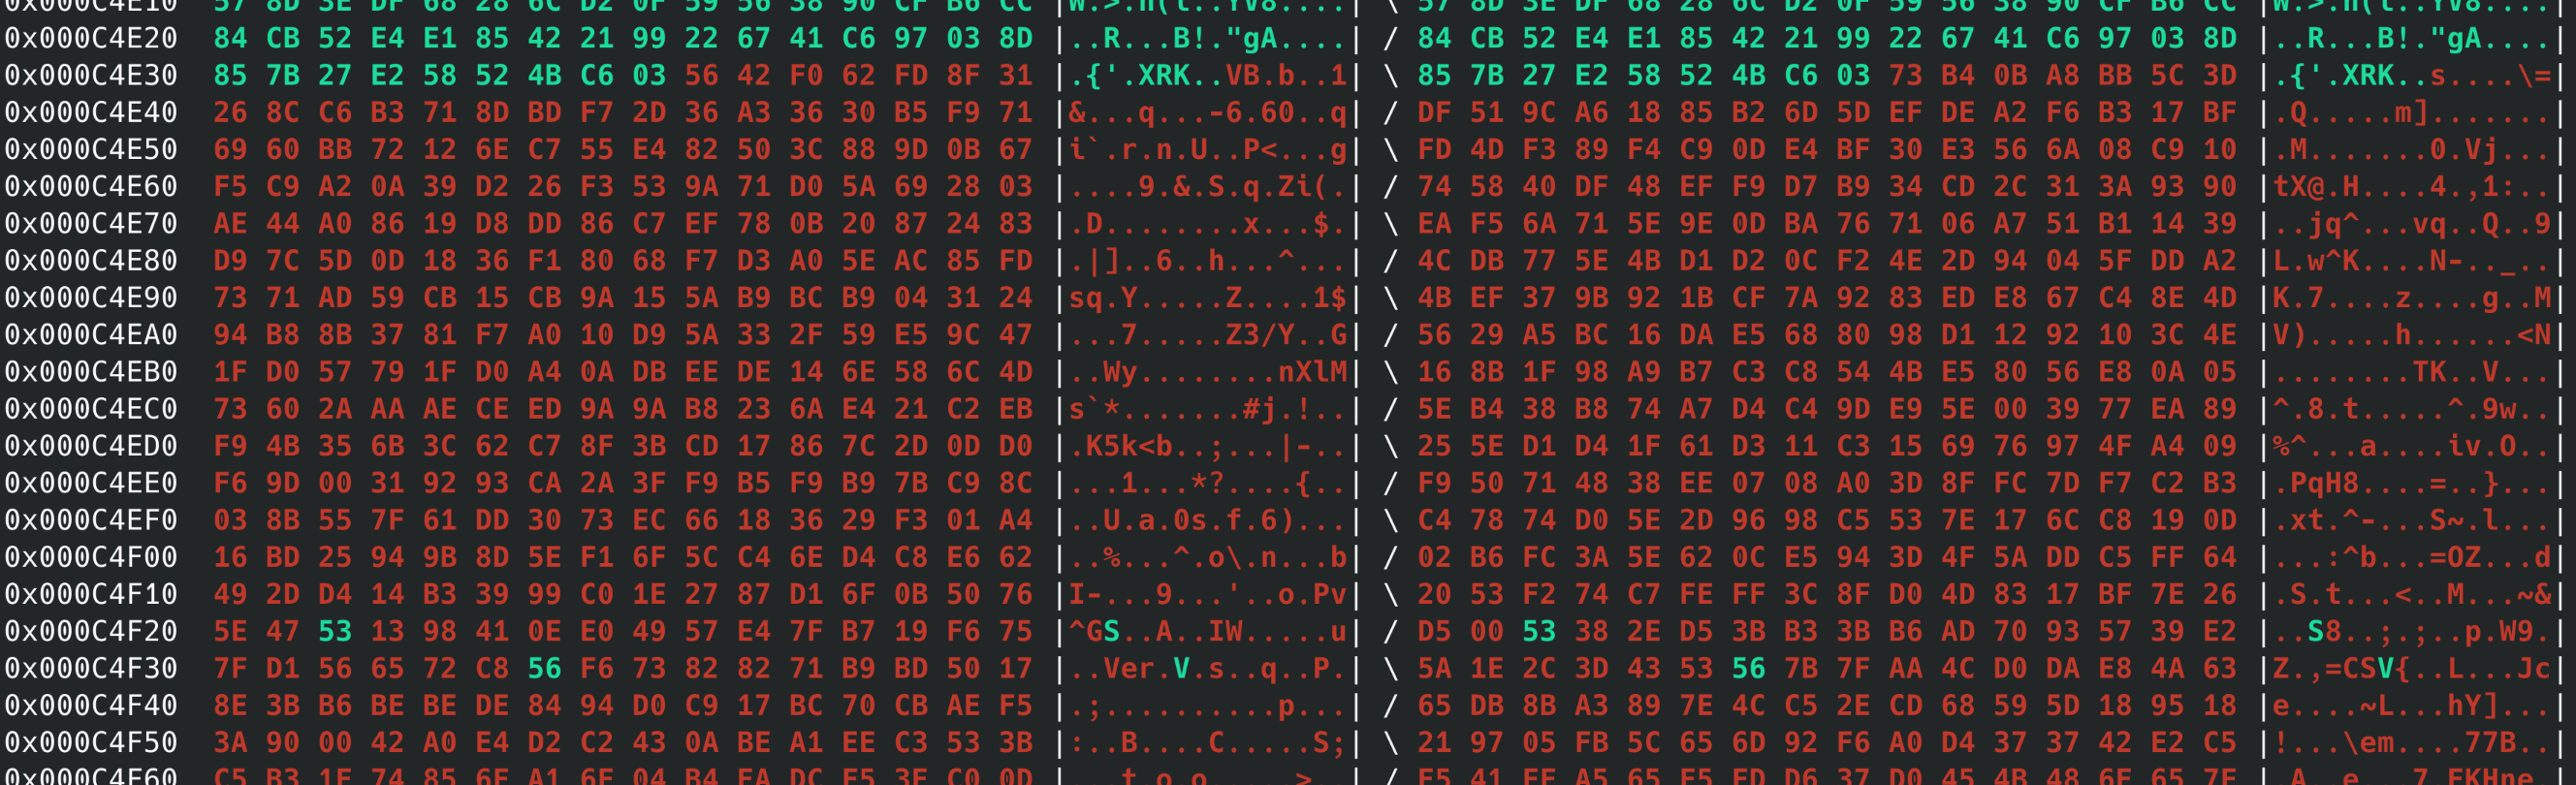
I also noticed that the left and right FotaPackage binaries had some curious differences - their headers only differed sporadically, while the body was identical except for the end, where there was about 7KB of complete difference.
The header (0x00-0x1000) appears to be unencrypted and only differs in small segments. Then, at the end, the footer suddenly changes to completely different, at around 0xC4E38.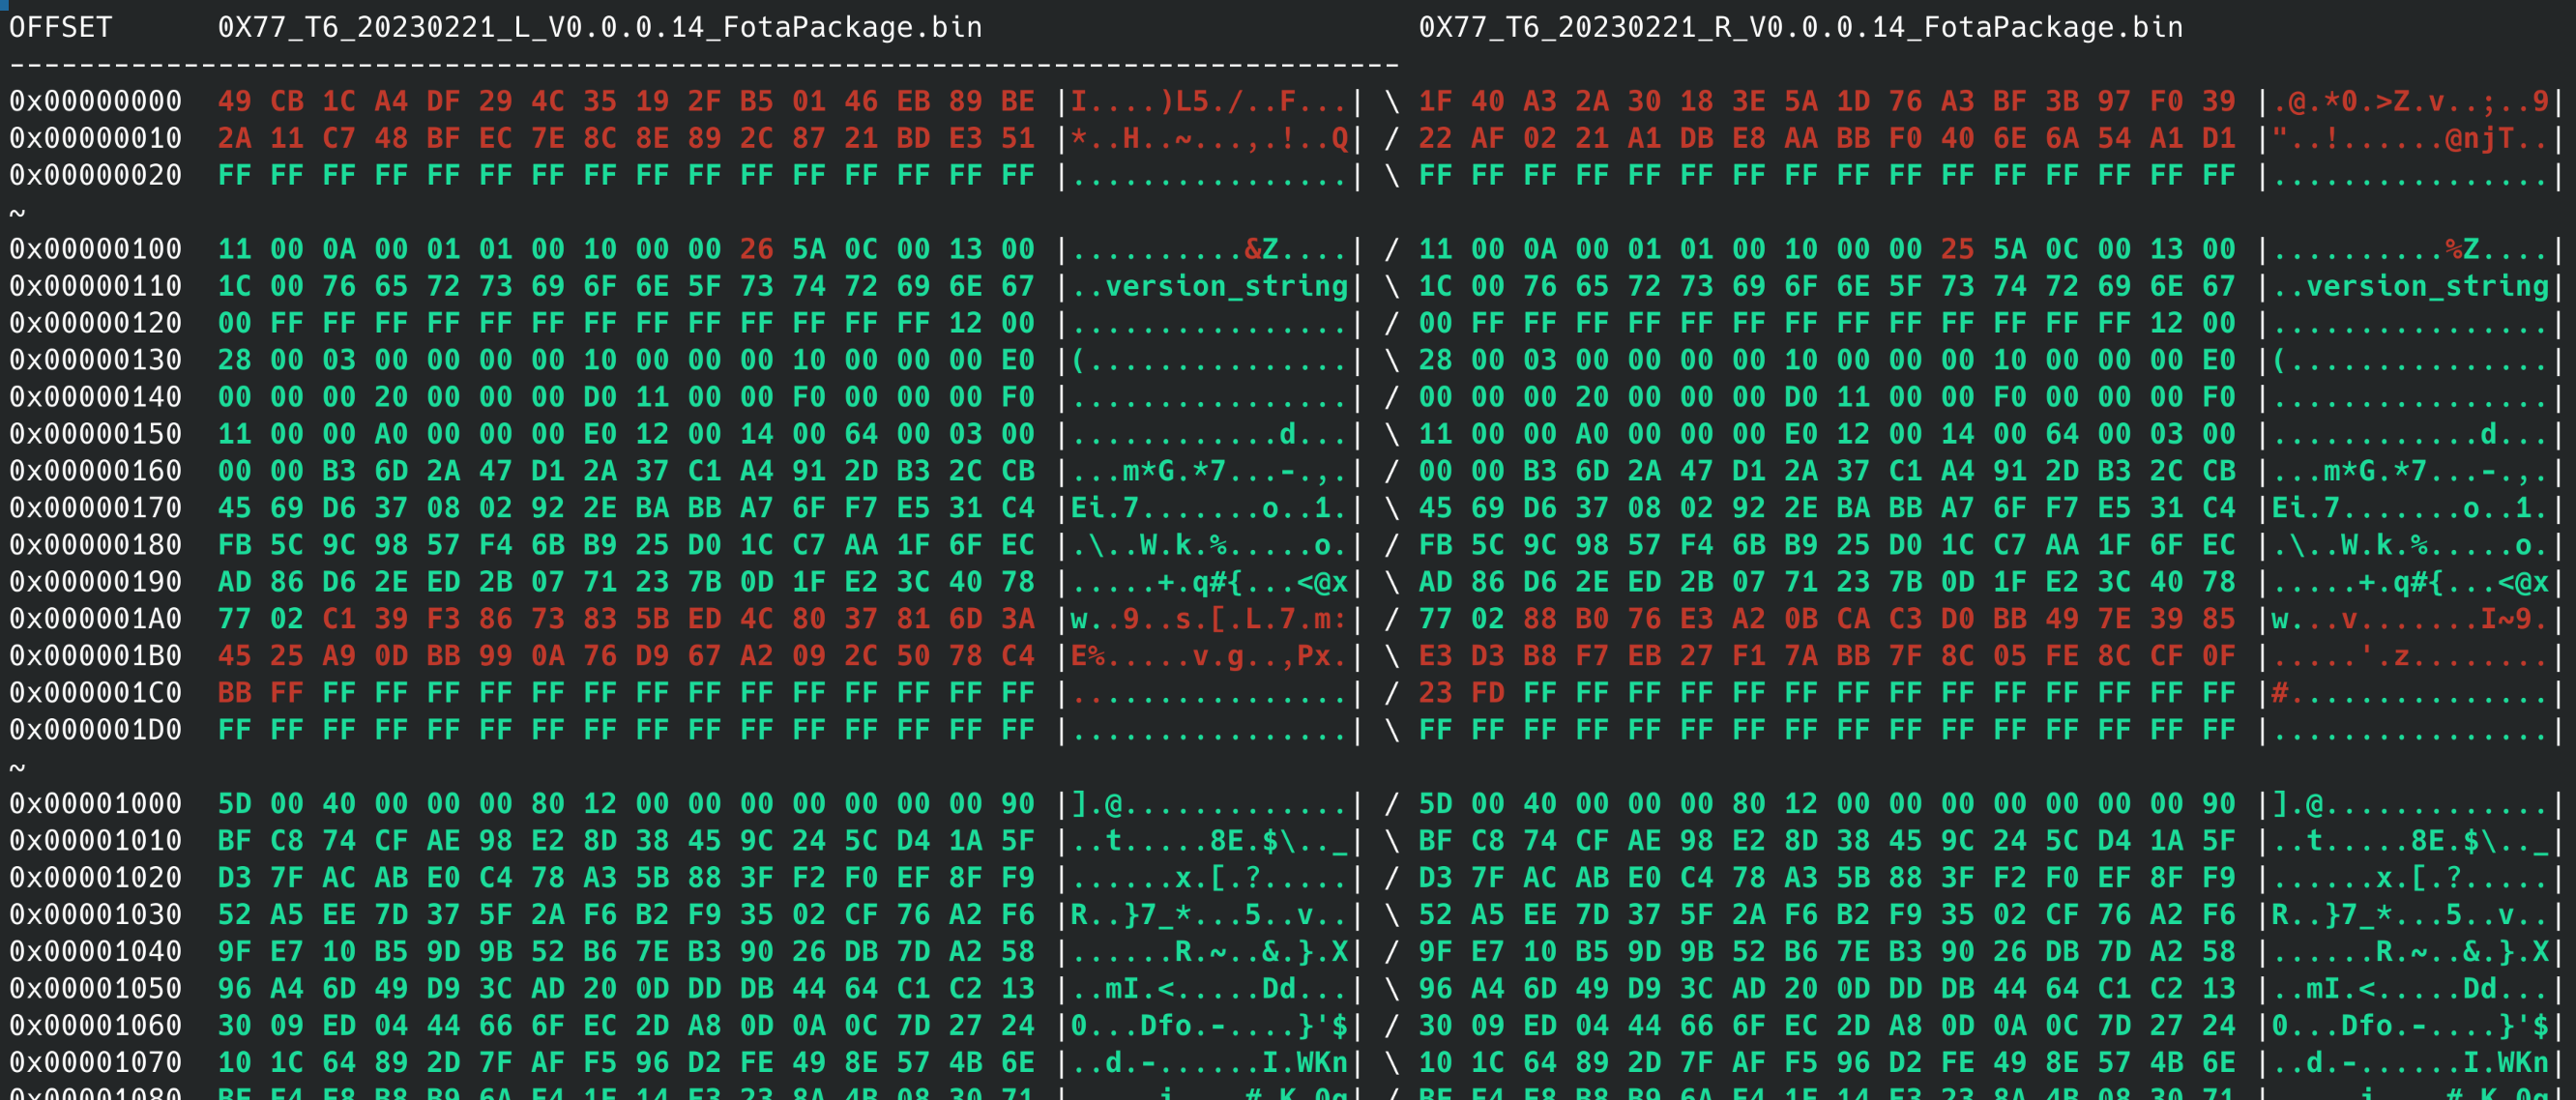
I wasn’t completely sure as to the meaning of this, beyond the fact that there was obviously some kind of opaque transformation at work. My initial guess was encryption, with the same key/IV but different plaintexts, and that the sudden difference corresponds to a single-byte difference (perhaps an #ifdef EARBUD_R doBluetoothMasterThings(); #else doBluetoothSlaveThings(); #endif sort of thing) that then leads to the rest of the file being different, but I wasn’t able to verify this. Regardless of why, it was obvious I wasn’t going to get anything out of them without serious effort.
A quick appraisal of the situation
The fact that we know the audio is mp3 was actually pretty bad news to me at first glance. My understanding of media encoders is that they generally have a lot of options for how to encode something, while sometimes a given decoder will barf on a perfectly well-formed file that happens to use a feature it wasn’t expecting.
This is very bad for us for two reasons:
- Our decoder is of utterly unknown provenance, who knows what it might barf on.
- The audio gets played right when the device first pairs, so if we produce an mp3 file that the decoder does not like and the device crashes before we can connect to it again, then we risk putting it into an unrecoverable state.
Furthermore, even if we use precisely the expected encoding parameters while producing our volume-adjusted mp3 files, if we change the length of the file while modifying it then we must also make sure that we account for this when we modify the filesystem image, where what that specifically means depends on the exact structure of the filesystem format. Presumably, it records the length of each file somewhere, and we need to make sure we adjust this number to accurately refect the new length of the file (or else it will either be truncated or have garbage added to the end). This is a lot of work, and with an uncertain outcome.
So, at this point I was somewhat worried about the future of this project, and was desperately trying to figure out how to proceed without any re-encoding.
Luckily, it turns out that you can indeed modify the volume (or “gain”) of an mp3 file without changing its length, or re-encoding it, or even modifying its metadata. It’s kind of like how you can rotate a JPEG file without re-encoding it as well - you can just look inside of its data structures and modify them for this one particular transformation without needing to change anything else. Pretty neat!
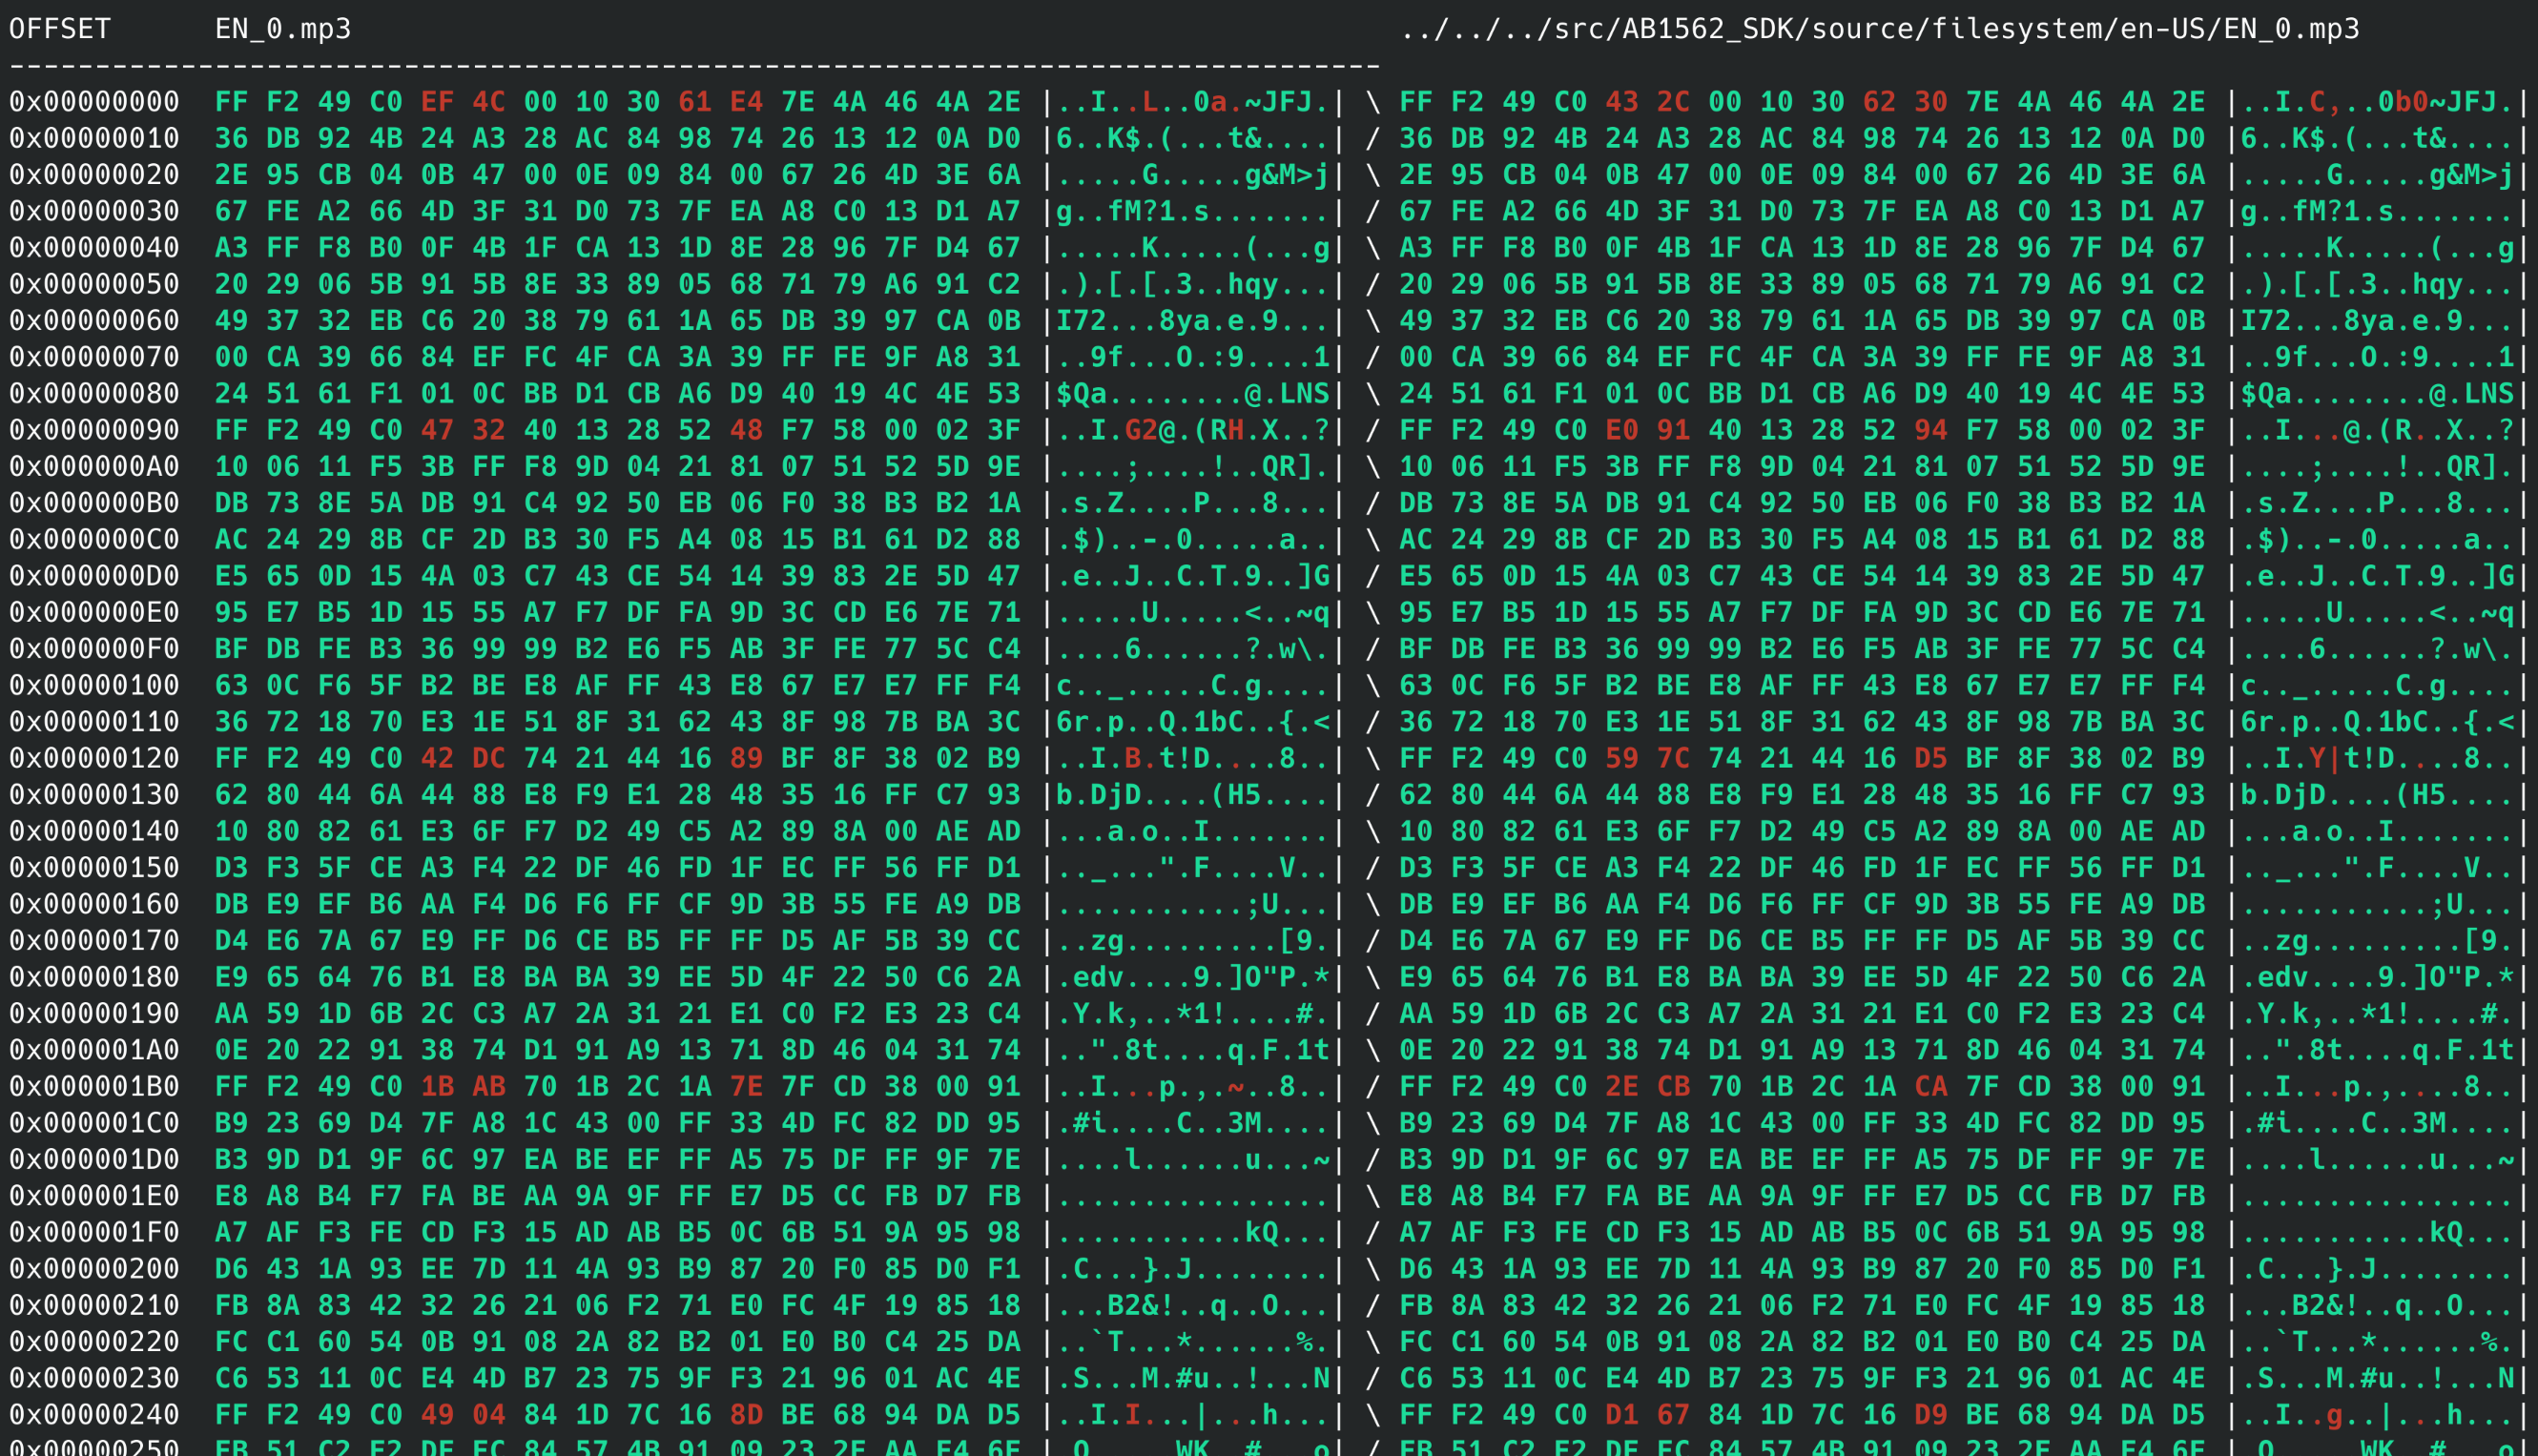
An mp3 file transformed with mp3gain - see, only a few bytes of difference.
ROFS
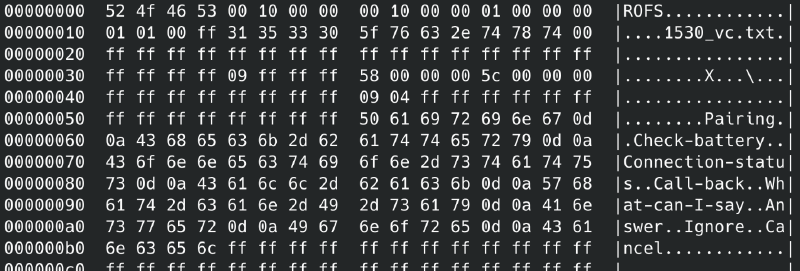
Back to the filesystem image - it seems to contain the mp3 files that correspond to the sounds I am trying to enquiet, and I want to replace them with modified versions, so at a bare minimum I need to know where files begin and end inside of the image. At this point, binwalk couldn’t identify them, so I thought that the problem was that either they were either obfuscated somehow (compressed/encrypted) or the structure of the filesystem might be making it difficult to identify them. So, I decided that the next point of attack was to understand the structure of the filesystem image, which begins with the ASCII string “ROFS”:
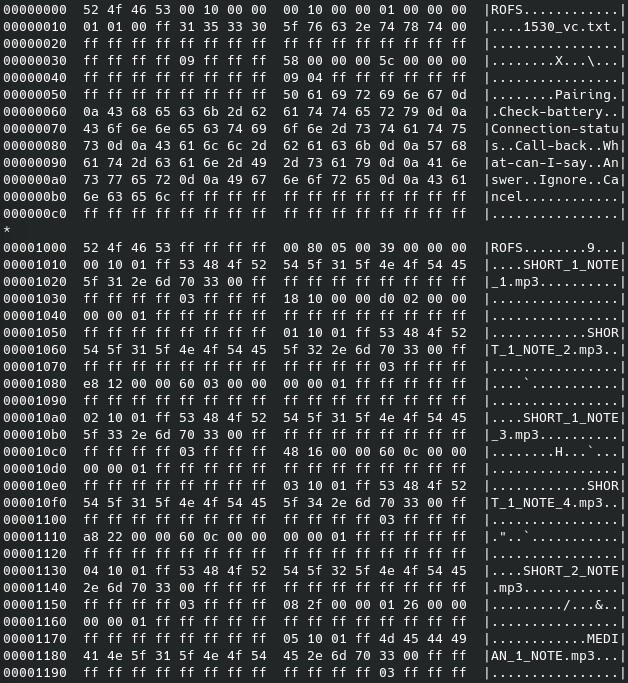
Hexdump of ROFS image.
The first step is to search for information about anything with that name online, but no dice. I’m pretty sure it’s bespoke to this particular chipset manufacturer, as I was completely unable to find any reference or documentation of something called “ROFS” that would describe the file I have and the Airoha SDK I would later find contains an implementation of an interface for reading files from it.
At this point, I made a somewhat regrettable decision that the next course of action was to try to attack the firmware, so that I could get to the code that presumably understands the filesystem image format. But the firmware code was (seemingly) encrypted, so I decided to see if they were doing something silly with their encryption and check if maybe the FotaPackage files were decrypted client-side by the SDK before being sent out over the wire. I was eventually able to ascertain with some certainty that the SDK does not transform the firmware in any way before sending it out, but it took me a few hours of reading decompiled code before I came to this conclusion. So of course, I didn’t succeed in attacking the firmware crypto and it was all a waste of time. Oh well.
SDK Breakthrough
The final breakthrough occurred when I searched for the chipset name online, and found a copy of their SDK. Looking through it, I could see that it had a bunch of .mp3 files in it - the same ones I could hear on the device. I wrote a quick python program to check if a file was contained within another file (probably a tool already exists for this?) and verified that the mp3 files in the SDK were contained in the filesystem image verbatim.
|
|
bincontains.py
Modifying the filesystem image
I was slightly worried that the ROFS image might contain additional data, such as checksums for the files inside of it, but I briefly skimmed the ROFS-related code from the SDK (unfortunately it only seemed to exist as prebuilt object files) and it only had a few symbols in it for operating on the filesystem, none of which suggested the presence of checksumming:
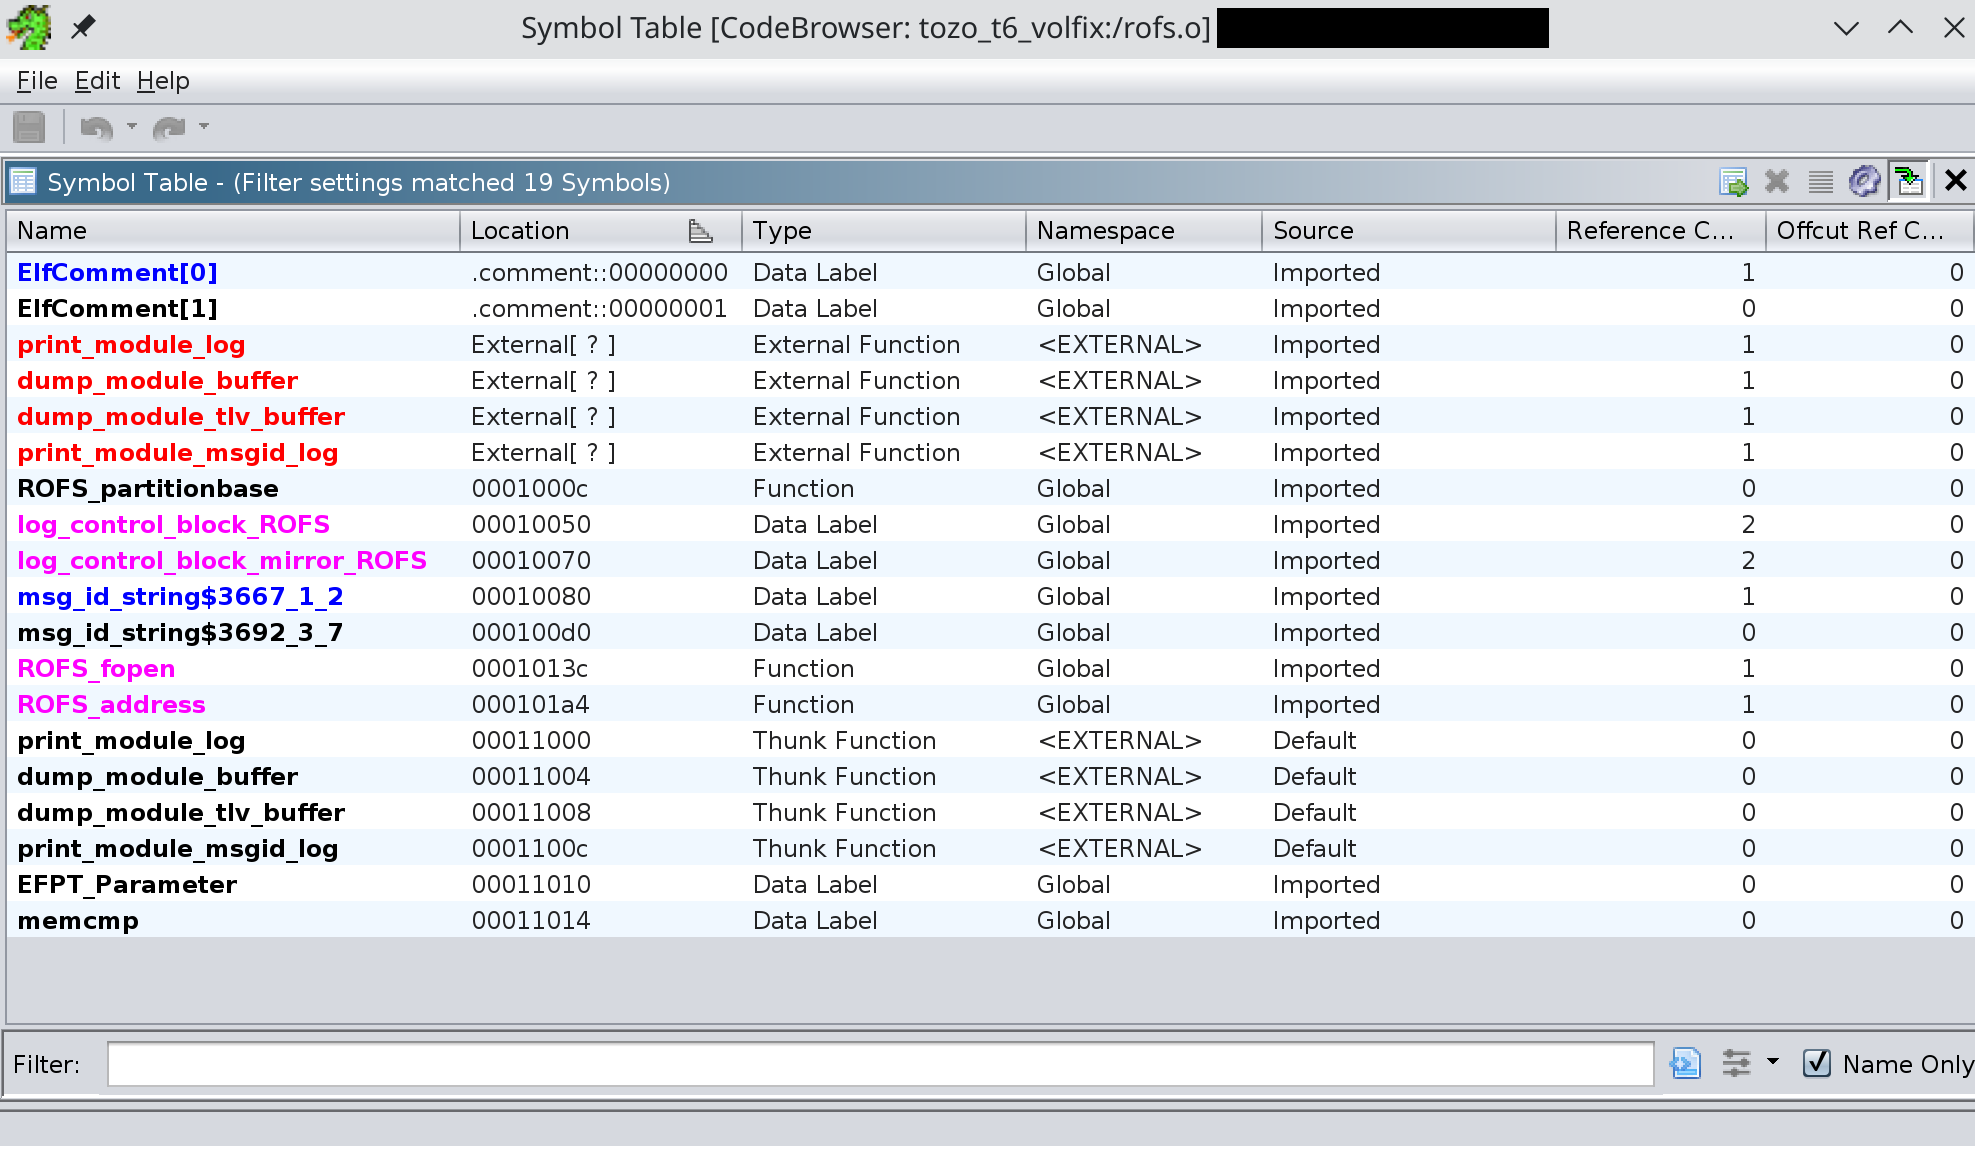
There’s not a lot of code in here, and there’s no external references to anything relating to checksumming.
So with that out of the way, at this point I actually have everything I need to complete the task of modifying the volume of the sound files in the firmware image with no further reverse engineering. I have:
- A way to flash updated firmware to the device, as well as the firmware files themselves.
- Knowledge that the mp3 files from the SDK are included verbatim in the filesystem image (no compression, splitting into blocks, etc). This means I have their lengths and offsets in the filesystem image.
- Knowledge that you can modify the gain of an mp3 file without re-encoding it or changing its length.
- The assumption that the filesystem format doesn’t include any checksumming or additional information about its files that would be invalidated upon modifying their occupant byte range in the image.
Then, it’s just as simple as looping over the mp3 files, and if it’s contained in the image, running mp3gain on the file and then replacing it in the image with the gain-modified version. I used an adjustment of -19.5 decibels.
|
|
binsearch.sh
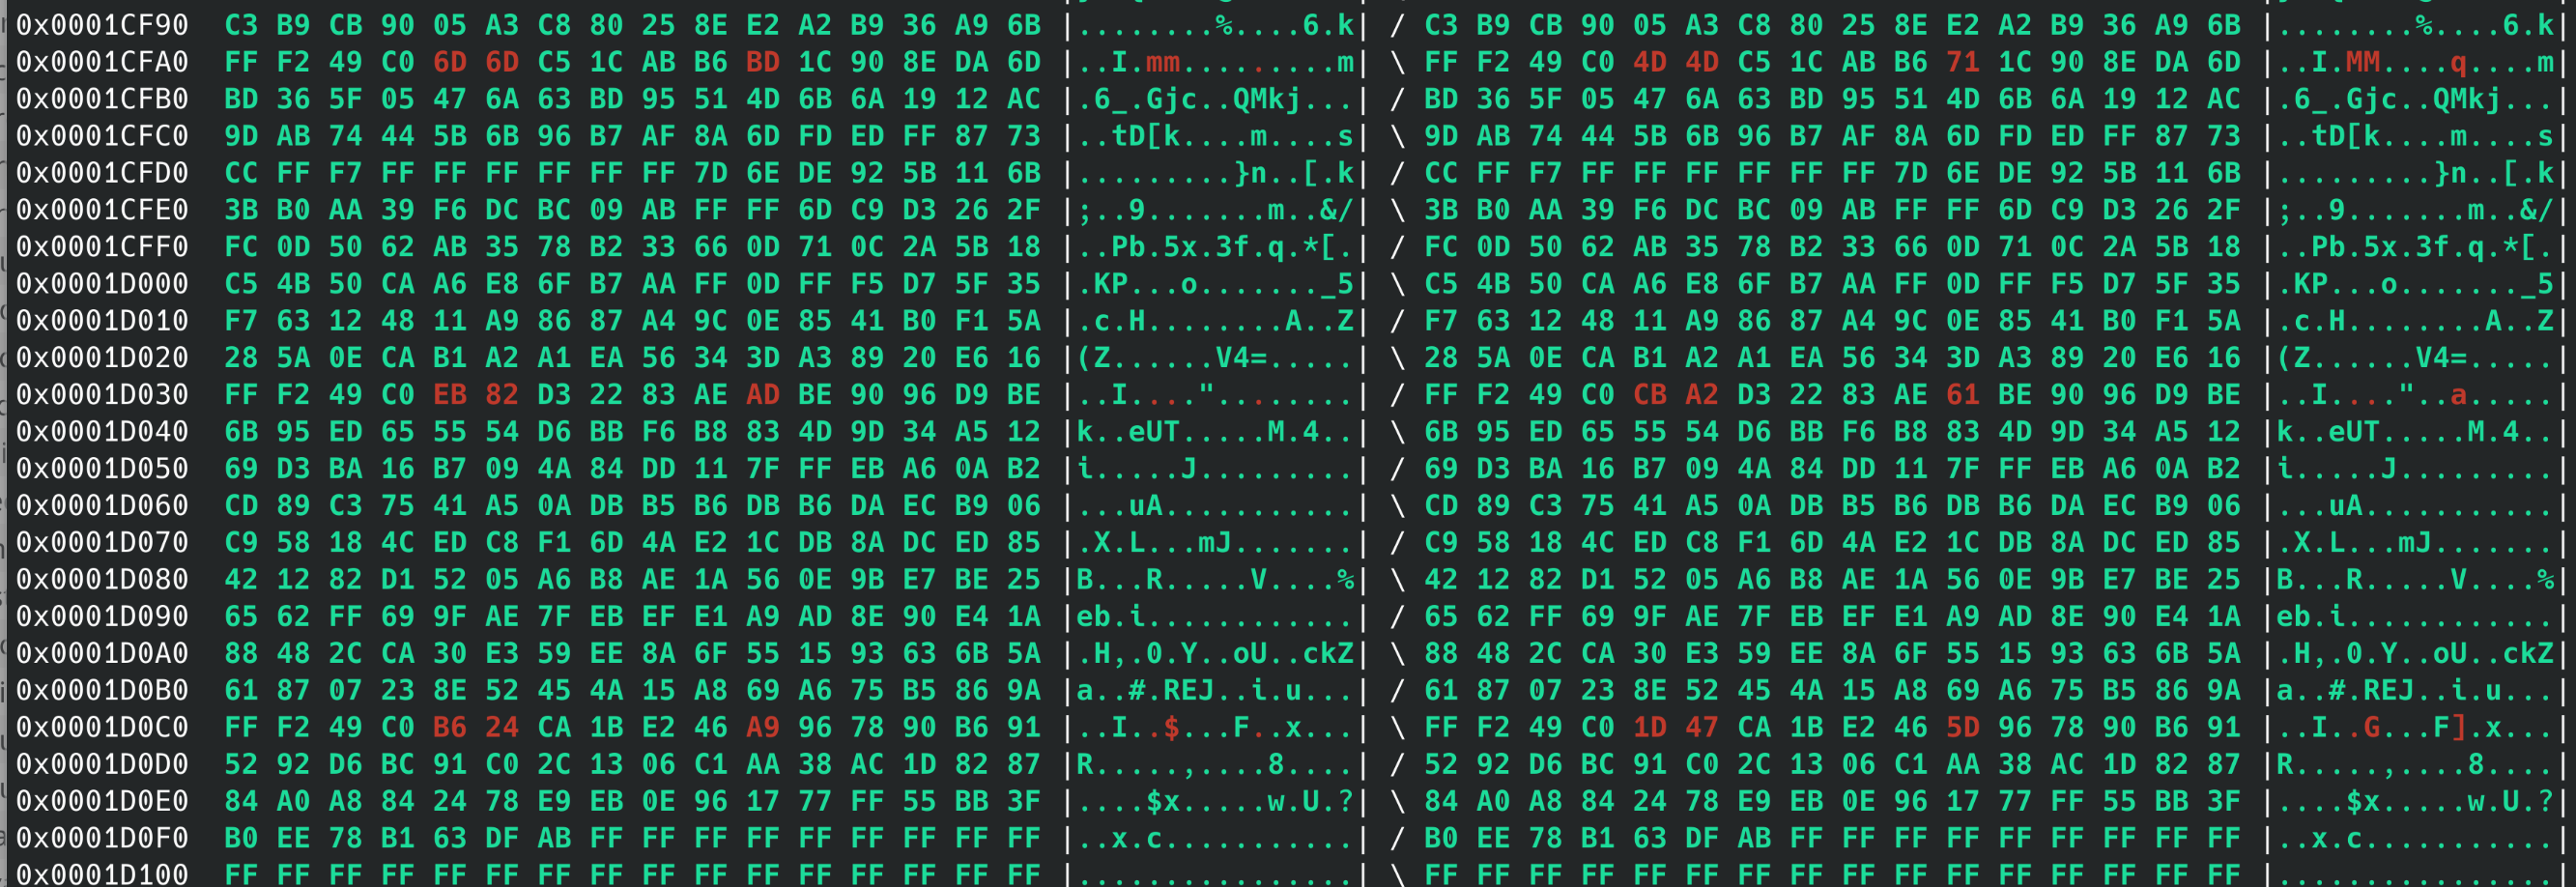
A quick binary diff of the final firmware image - only a few bytes of difference, as expected.
Finally, I flashed it to the device and it worked!
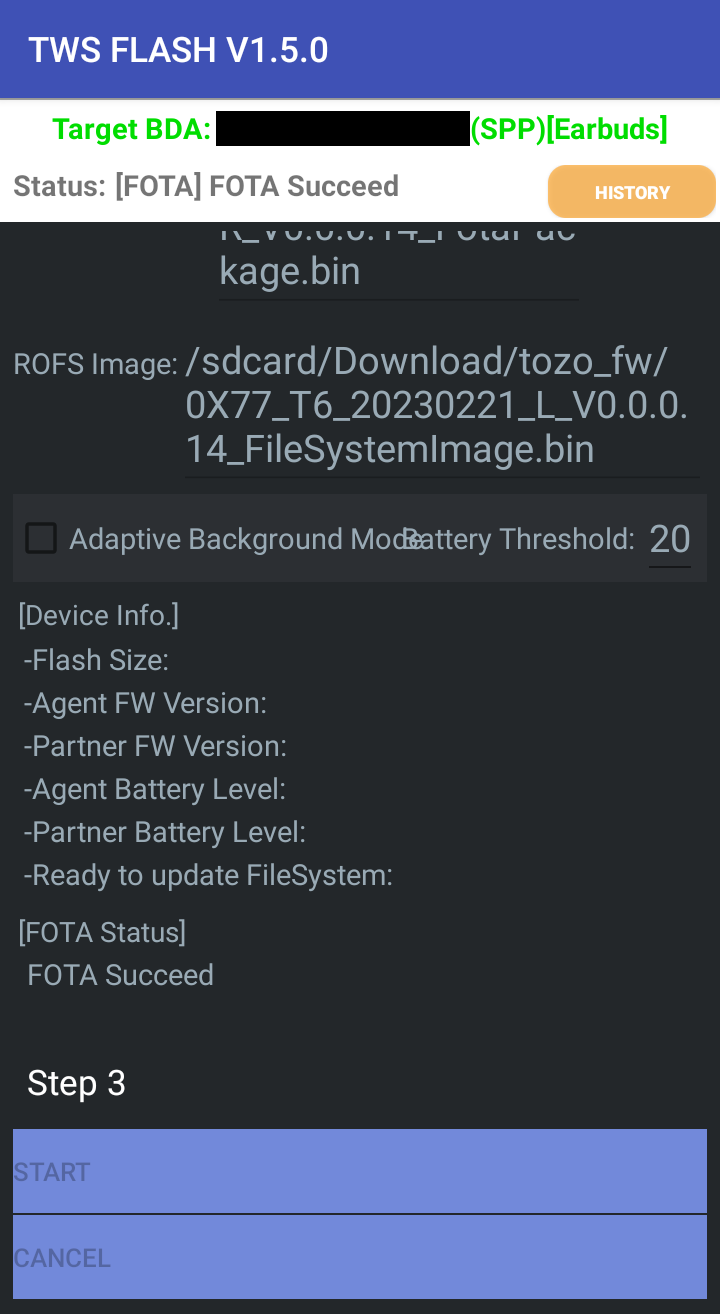
Hooray!
I shortly verified that the device was fully operational and the sound was, indeed, much quieter than it was when I started.
Mission accomplished!
That’s a wrap!
I didn’t end up having to decrypt the firmware (probably impossible for me) or understand the ROFS image format at all - most of the time spent reverse-engineering was actually going down rabbitholes that didn’t help me in the end.
I also kind of wish that volume control of system sounds was a first-class feature - from a UI perspective, I think it’s an error for a device that plays audio to not have a volume control that modifies all of the sound that gets produced by the device. But apparently it has a workaround, so I guess it’s fine.
But yeah, all in all this was a pretty fun little project, would do again/10.
-
I suspect that this is probably a “me” problem rather than a “them” problem because I have noticed a consistent pattern of having a much quieter preferred volume than other people, but that doesn’t change the fact that this equipment is junk to me unless I modify it so it suits my preferences. ↩︎
-
Can be found here: https://airpodsreplicas.com/useful-apps#airoha ↩︎
-
Only ones with chipset models beginning with 156-?, I assume? Of course, I can’t actually check, as I only have one Airoha device. ↩︎
-
This was easily the least pleasant part of this entire exercise, mostly because I am not very good at computer networking and so debugging opaque (to me) networking-related problems is way more stressful than most other computer operations. The ratio of “lines of decompiled code I would rather read than set this all up again from scratch” is probably about 10,000:1. ↩︎